n8n WhatsApp AI Agent ఎలా Setup చేయాలి | Meta Business Suite తో Complete Integration Guide 2026
సో ఈ article లో మీకు complete గా n8n WhatsApp AI Agent ఎలా setup చేయాలో. Facebook Meta Business Suite లో ఎలా login చేయాలో, App ID మరియు App Secret ఎలా తీసుకోవాలో, Access Token ఎలా generate చేయాలో, n8n లో ఏ nodes use చేయాలో, ఆ nodes మధ్య connections ఎలా set చేయాలో, అన్నీ step by step గా చెప్తాను. ఒక్క విషయం కూడా skip చేయలేదు, ముందు నుంచి చివరి వరకు full detailed గా ఉంది కాబట్టి article మొత్తం ఒక్కసారి carefully చదవండి.
సో ఒక్క important thing clear చేసుకుందాం. చాలా మంది WhatsApp automation గురించి వింటారు కానీ exactly ఎక్కడ నుంచి start చేయాలో, ఏ tool use చేయాలో, credentials ఎక్కడ నుంచి తీసుకోవాలో తెలియదు. ఇందుకే ఈ complete guide రాస్తున్నాను. n8n WhatsApp AI Agent అంటే మీరు ఒక్కసారి setup చేసిన తర్వాత, WhatsApp కి ఎవరైనా message చేసినప్పుడు AI automatically reply ఇచ్చేసి, మీరు ఏ పని లో ఉన్నా interrupt అవ్వకుండా business smooth గా run అవుతుంది. ఇది 2026 లో చాలా businesses use చేసే solution, మీరు కూడా today నుంచే start చేయవచ్చు.
మీకు తెలుసా, ఇది ఒక్క పెద్ద కంపెనీలకి మాత్రమే కాదు రా. ఇలాంటి low investment business ideas ఇప్పుడు చాలామంది AI Automation Agency గా మలుచుకుని క్లయింట్లకి ఇదే సెటప్ చేసిచ్చి డబ్బులు సంపాదిస్తున్నారు, ఇది Meta వాళ్ళ WhatsApp API మీద బేస్ అయినది కాబట్టి రిస్క్ కూడా తక్కువ.
n8n WhatsApp AI Agent అంటే ఏమిటి, ఇది ఎలా పని చేస్తుంది?
సో ముందుగా అర్థం చేసుకుందాం. n8n అనేది ఒక no-code automation platform, ఇందులో మీరు different apps మరియు services ని connect చేసి workflows create చేయవచ్చు. మీకు coding తెలియాల్సిన అవసరం లేదు, drag and drop చేసి nodes connect చేసి ఏ kind of automation అయినా build చేయవచ్చు. 2026 లో చాలా businesses customer support, lead management, order tracking అన్నీ n8n తో automate చేసుకుంటున్నాయి, ఎందుకంటే ఒక్కసారి setup చేసిన తర్వాత manually చేయాల్సిన పని దాదాపు zero అయిపోతుంది.
WhatsApp Business Cloud API అంటే Meta officially provide చేసిన ఒక API, దీని ద్వారా మీరు programs మరియు automation tools తో WhatsApp messages send చేయవచ్చు, receive చేయవచ్చు. మీరు normal గా use చేసే personal WhatsApp ని directly tools తో connect చేయడం possible కాదు, అందుకే Meta ఈ Business Cloud API provide చేస్తుంది. ఇది completely official మరియు secure, Meta తో directly integrated అయి ఉంటుంది కాబట్టి reliability కూడా బాగుంటుంది.
సో ఇప్పుడు ఈ workflow మొత్తం ఎలా పని చేస్తుందో చూద్దాం. Customer ఒక message పంపిన వెంటనే WhatsApp Business Cloud API trigger అవుతుంది, ఆ trigger n8n కి signal ఇస్తుంది, n8n లో AI Agent ఆ message చదివి reply generate చేస్తుంది, ఆ reply మళ్ళీ WhatsApp ద్వారా customer కి వెళ్ళిపోతుంది. ఇది కొన్ని seconds లోపే complete అయిపోతుంది, 24 గంటలూ పని చేస్తుంది.
Workflow ఎలా కనిపిస్తుందో అర్థం చేసుకోండి
Customer WhatsApp లో Message పంపుతాడు
            ↓
WhatsApp Business Cloud Trigger Node (On Message) activate అవుతుంది
            ↓
Message body AI Agent Node కి pass అవుతుంది
            ↓
AI Agent (GPT-4o mini) reply generate చేస్తుంది
            ↓
WhatsApp Business Cloud Send Message Node reply పంపుతుంది
            ↓
Customer కి Auto Reply వస్తుంది
ఇది complete flow. ఈ flow లో మూడు main nodes ఉన్నాయి. ఈ మూడు nodes setup చేయడమే ఈ guide యొక్క core part.
Setup కోసం మీ దగ్గర ఇవి Ready గా ఉండాలి
| అవసరమైనది | ఎక్కడ తీసుకోవాలి | ఎందుకు కావాలి |
|---|---|---|
| Facebook Personal Account | facebook.com | Meta Business Suite login కి |
| n8n Account | n8n.io | Workflow build చేయడానికి |
| OpenAI API Key | platform.openai.com | AI brain (GPT-4o mini) కోసం |
| WhatsApp Number | మీ phone | Testing కోసం recipient గా |
| Laptop లేదా Computer | మీ దగ్గర ఉన్నది | Setup చేయడానికి |
అన్నీ ready గా ఉన్నాయా? అయితే Meta Business Suite నుంచి start చేద్దాం.
ఈ లిస్ట్ చూశారా, పెద్ద ఖర్చు ఏం లేదు, ల్యాప్టాప్ ఒక్కటుంటే చాలు. ఇలాంటి low investment ఐడియా కావాలంటే మా Custom API Integration బ్లాగ్ కూడా చూడండి, ఇక్కడ లాజిక్ అక్కడ కూడా వర్తిస్తది.
Step 1 : Meta Business Suite లో Business Portfolio Create చేయడం
సో browser లో business.facebook.com open చేయండి. మీ personal Facebook account తో login చేయండి, casual daily use చేసే account సరిపోతుంది, కొత్తది create చేయాల్సిన పని లేదు. Login అయిన తర్వాత left side లో menu లో Business Portfolios అనే option కనిపిస్తుంది. మీకు new account అయితే ఇది empty గా ఉంటుంది, ఒక్క portfolio కూడా ఉండదు. ఇప్పుడు Create Business Portfolio మీద click చేయండి.
ఒక form open అవుతుంది, అందులో మీ details fill చేయాలి. Portfolio Name లో మీ business పేరు enter చేయండి, ఇది customers కి కనిపించదు, మీకు identify చేసుకోవడానికి మాత్రమే. మీ first name, last name, business email address enter చేయాలి. అన్నీ fill చేసిన తర్వాత Submit click చేయండి. కొన్నిసార్లు Meta మీ mobile కి OTP పంపుతుంది మరియు email కి కూడా OTP వస్తుంది, రెండూ verify చేయండి, అది security process మాత్రమే.
Step 2 : Facebook App Create చేయడం
సో Business Portfolio create అయిన తర్వాత ఇప్పుడు Facebook App create చేయాలి. ఈ App ద్వారానే WhatsApp Business Cloud API ని n8n తో connect చేయగలుగుతాం. App ID మరియు App Secret ఈ App నుంచే వస్తాయి, అవి n8n లో WhatsApp trigger node కి కావాలి.
App create చేయడానికి ఈ steps follow చేయండి.
- business.facebook.com లో Settings మీద click చేయండి (left side లో bottom లో ఉంటుంది)
- Left menu లో Accounts section లో Apps option click చేయండి
- Right side లో plus icon click చేయండి
- Create a New App ID select చేయండి
- Confirm button click చేయండి
- Meta mobile OTP మరియు email OTP పంపుతుంది, రెండూ verify చేయండి
- Verify అయిన తర్వాత App creation form open అవుతుంది
- App Name field లో పేరు enter చేయండి (ఉదాహరణకు “WhatsApp AI Test”)
- Email Address enter చేయండి
- Next click చేయండి
- Use Cases page లో scroll down చేసి Other select చేయండి
- App Type లో Business select చేయండి
- Next click చేయండి
- Summary page లో అన్నీ correct గా ఉన్నాయా check చేసి Create App click చేయండి
- Facebook password enter చేయమని అడుగుతుంది, enter చేయండి
App create అయిపోయింది.
Step 3 : App ID మరియు App Secret Copy చేయడం
సో App create అయిన తర్వాత ఇప్పుడు App ID మరియు App Secret తీసుకోవాలి. ఇవి రెండూ n8n లో WhatsApp trigger node credential set up చేయడానికి కావాలి కాబట్టి, వీటిని safe గా note చేసుకోండి. ఎవరికీ share చేయకండి ఎందుకంటే ఇవి మీ App యొక్క master keys వంటివి.
- App Dashboard లో left menu లో App Settings click చేయండి
- Basic option select చేయండి
- App ID కనిపిస్తుంది, దాన్ని copy చేయండి
- App Secret కనిపిస్తుంది, Show button click చేస్తే visible అవుతుంది, దాన్ని copy చేయండి
ఇప్పుడు WhatsApp ని App తో link చేయాలి.
- App Dashboard లో WhatsApp section కనిపిస్తుంది
- దాని పక్కన Set up button click చేయండి
- Continue button click చేయండి
WhatsApp ఇప్పుడు మీ App తో connected అయిపోయింది.
Step 4 : WhatsApp API Setup, Test Number, Access Token
సో WhatsApp API setup చేద్దాం. ఇక్కడ మీకు రెండు important values తీసుకోవాలి. ఒకటి Access Token, రెండవది WhatsApp Business Account ID. ఈ రెండూ n8n లో Send Message node credential set చేయడానికి కావాలి. Meta Business Suite లో WhatsApp option click చేసి API Setup page open చేయండి.
API Setup page లో మీకు Meta ఇచ్చిన ఒక test phone number కనిపిస్తుంది. ఇది మీ personal number కాదు, Meta ఇచ్చిన demo number. Testing కోసం ఈ number use చేస్తాం. ఇప్పుడు Recipient phone number add చేయాలి, అంటే test message ఏ number కి వెళ్ళాలో ఆ number add చేయాలి.
Recipient Phone Number Add చేయడానికి
- Select a Recipient Phone Number dropdown పక్కన Manage Phone Number List click చేయండి
- ఒక popup వస్తుంది, India search చేయండి
- India select చేయండి
- మీ WhatsApp number enter చేయండి, country code తో సహా (ఉదాహరణకు +918187xxxxxx)
- Add చేసిన తర్వాత verification OTP వస్తుంది, verify చేయండి
Access Token Generate చేయడానికి
- API Setup page లో Generate Access Token button click చేయండి
- Popup వస్తుంది, Continue click చేయండి
- “Opt-in to all current and future WhatsApp accounts” select చేసి Continue click చేయండి
- Got it click చేయండి
- Long access token generate అవుతుంది, దాన్ని copy చేయండి
- Same page లో WhatsApp Business Account ID కూడా కనిపిస్తుంది, దాన్ని కూడా copy చేయండి
ఇప్పుడు మీ దగ్గర ఈ నాల్గు values ఉన్నాయి. ఇవి n8n లో use చేస్తాం.
| Value | ఎక్కడ దొరికింది | ఎక్కడ Use చేస్తాం |
|---|---|---|
| App ID | Facebook App Settings > Basic | n8n WhatsApp Trigger Node Credential |
| App Secret | Facebook App Settings > Basic | n8n WhatsApp Trigger Node Credential |
| Access Token | WhatsApp API Setup | n8n Send Message Node Credential |
| Business Account ID | WhatsApp API Setup | n8n Send Message Node Credential |
ఒక important point గుర్తు పెట్టుకోండి. ఇప్పుడు generate చేసిన Access Token temporary. 24 గంటల తర్వాత expire అయిపోతుంది. Testing కి ఇది సరిపోతుంది. Production కి permanent token setup చేయాలి, అది తర్వాత explain చేస్తాను.
Step 5 : n8n లో Workflow Build చేయడం
సో ఇప్పుడు అసలు main part వచ్చింది. n8n.io లో login అవ్వండి. New Workflow create చేయండి. Workflow పేరు పైన click చేసి rename చేయవచ్చు, “WhatsApp AI Agent” లేదా మీకు నచ్చిన పేరు పెట్టుకోండి. ఈ workflow లో మూడు nodes add చేయాలి, ఇదే స్కిల్ మీకు జాబ్ వెతకనవసరం లేకుండా చేస్తది. ఇంట్లో కూర్చుని women కూడా ఇదే సర్వీస్ ఇచ్చి సంపాదించొచ్చు, మా No-Code AI SaaS Business బ్లాగ్లో ఈ ఐడియా పూర్తిగా ఉంది. వాటి మధ్య connections set చేయాలి. ఒక్కొక్క node ఏమిటో, ఎలా setup చేయాలో, ఏ fields fill చేయాలో, ఏ credentials use చేయాలో అన్నీ ఇప్పుడు చూద్దాం.
ఈ Workflow లో Use అయ్యే Nodes
| Node పేరు | Node Type | పని ఏమిటి |
|---|---|---|
| WhatsApp Business Cloud | Trigger (On Message) | Customer message వచ్చినప్పుడు workflow start చేస్తుంది |
| AI Agent | Action | Message చదివి AI reply generate చేస్తుంది |
| OpenAI Chat Model | Sub-node of AI Agent | AI brain, GPT-4o mini model use చేస్తుంది |
| WhatsApp Business Cloud | Action (Send Message) | AI reply ని customer కి WhatsApp లో పంపుతుంది |
Node 1 : WhatsApp Business Cloud Trigger Node Setup
సో ఇది మొదటి node. WhatsApp లో ఎవరైనా message చేసినప్పుడు ఈ node trigger అవుతుంది మరియు ఆ message data తీసుకుని next node కి pass చేస్తుంది. ఇది workflow యొక్క starting point.
Workflow లో plus icon click చేయండి. Search box లో “WhatsApp” type చేయండి. WhatsApp Business Cloud అని వస్తుంది, దాన్ని click చేయండి. Triggers section లో “On Message” option select చేయండి. Trigger node workflow లో add అవుతుంది.
WhatsApp Trigger Node Credential Setup
ఆ node మీద click చేయండి. Right side లో settings panel open అవుతుంది. Credential to connect with అనే field కనిపిస్తుంది. Select Credential click చేసి Create New select చేయండి.
ఒక form వస్తుంది. ఇందులో రెండు fields ఉంటాయి.
| Field Name | Enter చేయాల్సింది |
|---|---|
| Client ID | Facebook App ID (Step 3 లో copy చేసిన App ID) |
| Client Secret | Facebook App Secret (Step 3 లో copy చేసిన App Secret) |
రెండూ paste చేసిన తర్వాత Save click చేయండి. n8n connection test చేస్తుంది. “Connection tested successfully” అని green message వస్తుంది చూసారా? వస్తే correct గా connect అయింది అని అర్థం. ఆ credential trigger node లో select చేయండి. Node save చేయండి.
ఇప్పుడు ఈ trigger node ready గా ఉంది. WhatsApp లో message వచ్చినప్పుడు ఈ node activate అవుతుంది, message data ని capture చేసి next node కి send చేస్తుంది.
Node 2 : AI Agent Node Setup
సో ఇది రెండవ node, మరియు ఇదే entire workflow యొక్క brain. ఈ node WhatsApp నుంచి వచ్చిన message చదువుతుంది, AI model use చేసి ఒక smart reply generate చేస్తుంది, ఆ reply ని next node కి pass చేస్తుంది. ఇక్కడ Chat Model, System Prompt, User Message అన్నీ carefully configure చేయాలి.
WhatsApp Trigger node కి right side లో plus icon click చేయండి. Search box లో “AI Agent” type చేయండి. AI Agent option కనిపిస్తుంది, దాన్ని click చేయండి. Node workflow లో add అవుతుంది.
ఎందుకురా బాబు ఈ ఐటీ ఉద్యోగాలు? Coconut Selling Business తో నెలకు లక్షలు సంపాదించండి!
ఎందుకురా బాబు ఈ ఐటీ ఉద్యోగాలు? Coconut Selling Business తో నెలకు లక్షలు సంపాదించండి! …
Claude Code Free Alternative – NVIDIA Free API తో DeepSeek V3 Pro Setup చేసుకోవడం ఎలా
Claude Code Free Alternative – NVIDIA Free API తో DeepSeek V3 Pro …
Google Reviews ద్వారా ఇంట్లో కూర్చుని డబ్బులు సంపాదించటం ఎలా ?
Google Reviews ద్వారా ఇంట్లో కూర్చుని డబ్బులు సంపాదించటం ఎలా? By Shiv shankar తమ్ముడు, …
AI Side Hustle in Village ద్వారా ఒక నిరుద్యోగి నుండి Mandal Level AI Teacher గా మారే Complete Roadmap
AI Side Hustle in Village ద్వారా ఒక నిరుద్యోగి నుండి Mandal Level AI …


AI Agent Node లో Sub-Nodes
AI Agent node open చేయండి. ఈ node లో కొన్ని important sections ఉన్నాయి.
| Section | ఏమి చేస్తుంది | ఏమి Select చేయాలి |
|---|---|---|
| Chat Model | AI brain connect చేస్తుంది | OpenAI Chat Model (GPT-4o mini) |
| User Message | Customer message AI కి pass అవుతుంది | WhatsApp Trigger body field |
| System Prompt | AI కి background instructions | మీ business గురించి రాయాలి |
| Memory (Optional) | Conversation history remember చేస్తుంది | Window Buffer Memory |
| Tools (Optional) | External services connect చేస్తుంది | Google Calendar, Sheets etc. |
Chat Model Connect చేయడం
- Chat Model field కి right side లో plus icon click చేయండి
- OpenAI Chat Model select చేయండి
- OpenAI API key enter చేయమని అడుగుతుంది, enter చేసి Save చేయండి
- Model selection లో gpt-4o-mini select చేయండి (affordable మరియు good performance)
User Message Map చేయడం
User Message field లో WhatsApp trigger నుంచి వచ్చిన message text map చేయాలి. ఈ field మీద click చేయండి. Expression editor open అవుతుంది. WhatsApp trigger node output లో message text body field లో ఉంటుంది. ఆ field select చేసి ఇక్కడ map చేయండి. ఇప్పుడు customer పంపిన message AI కి automatically reach అవుతుంది.
System Prompt రాయడం
System Prompt field లో AI కి instructions రాయాలి. ఇది customer కి కనిపించదు. ఇందులో మీ business ఏమిటో, AI ఎలా respond చేయాలో, ఏం చేయకూడదో రాయాలి. ఉదాహరణకు ఇలా రాయవచ్చు.
“You are a helpful customer support assistant for [మీ Business Name]. Always reply in Telugu and English. Be friendly, polite, and give short clear answers. If you do not know the answer to any question, tell the customer that you will check with the team and reply soon. Do not share any pricing details, do not make any commitments on behalf of the business.”
ఇది మీ business కి అనుగుణంగా edit చేసుకోండి. System Prompt బాగా రాసినప్పుడు AI performance చాలా better అవుతుంది. మంచి prompt రాయడం అంటే మీ బిజినెస్కి personality ఇవ్వడమే. ఈ skill తో content business కూడా పెట్టుకోవచ్చు, మా Gemini Content Business బ్లాగ్ చూడండి, OpenAI prompt గైడ్ కూడా ఫ్రీగా ఉంది.
Memory Add చేయడం (Optional కానీ Recommended)
Default గా AI ప్రతి message ని separately treat చేస్తుంది, conversation history remember చేయదు. Memory add చేస్తే, customer రెండో message పంపినప్పుడు మొదటి message context AI కి తెలుసు, natural conversation feel వస్తుంది.
- AI Agent node లో Memory section లో plus icon click చేయండి
- Window Buffer Memory select చేయండి
- Save చేయండి
ఇప్పుడు AI conversation history maintain చేస్తుంది.
Node 3 : WhatsApp Business Cloud Send Message Node Setup
సో ఇది మూడవ మరియు last node. AI Agent generate చేసిన reply ని WhatsApp లో customer కి పంపడానికి ఈ node పని చేస్తుంది. ఈ node setup చేయడానికి access token మరియు business account ID కావాలి, అవి Step 4 లో copy చేసాం కదా.
AI Agent node కి right side లో plus icon click చేయండి. Search box లో “WhatsApp” type చేయండి. ఈసారి Actions section లో Send Message option కనిపిస్తుంది, దాన్ని click చేయండి. Node add అవుతుంది.
WhatsApp Send Message Node Credential Setup
Node open చేయండి. Credential to connect with field కనిపిస్తుంది. Select Credential click చేసి Create New select చేయండి. ఈసారి form లో different fields ఉంటాయి.
| Field Name | Enter చేయాల్సింది |
|---|---|
| Access Token | Step 4 లో generate చేసిన Access Token |
| Business Account ID | Step 4 లో copy చేసిన WhatsApp Business Account ID |
రెండూ paste చేసి Save click చేయండి. Connection tested successfully వస్తే correct. ఆ credential node లో select చేయండి.
No posts

Send Message Node Fields Configure చేయడం
ఇప్పుడు node లో fields fill చేయాలి. ఇవి చాలా important, తప్పు చేస్తే message wrong number కి వెళ్తుంది.
| Field | Enter చేయాల్సింది | ఎందుకు |
|---|---|---|
| Phone Number ID | Dropdown లో test number select చేయండి | ఏ number నుంచి message send అవుతుందో |
| Recipient Phone Number | WhatsApp Trigger “from” field map చేయండి | ఎవరికి reply వెళ్ళాలో |
| Message Body | AI Agent output text map చేయండి | AI generate చేసిన reply |
Recipient Phone Number field లో static number enter చేయకండి. Expression editor use చేసి WhatsApp Trigger output లో “from” field map చేయండి. అప్పుడు ఎవరు message చేసినా వారికే reply automatically వెళ్తుంది.
Message Body field లో AI Agent output map చేయండి. AI Agent node output లో generated reply text ఉంటుంది, దాన్ని ఇక్కడ map చేయండి. Save చేయండి.
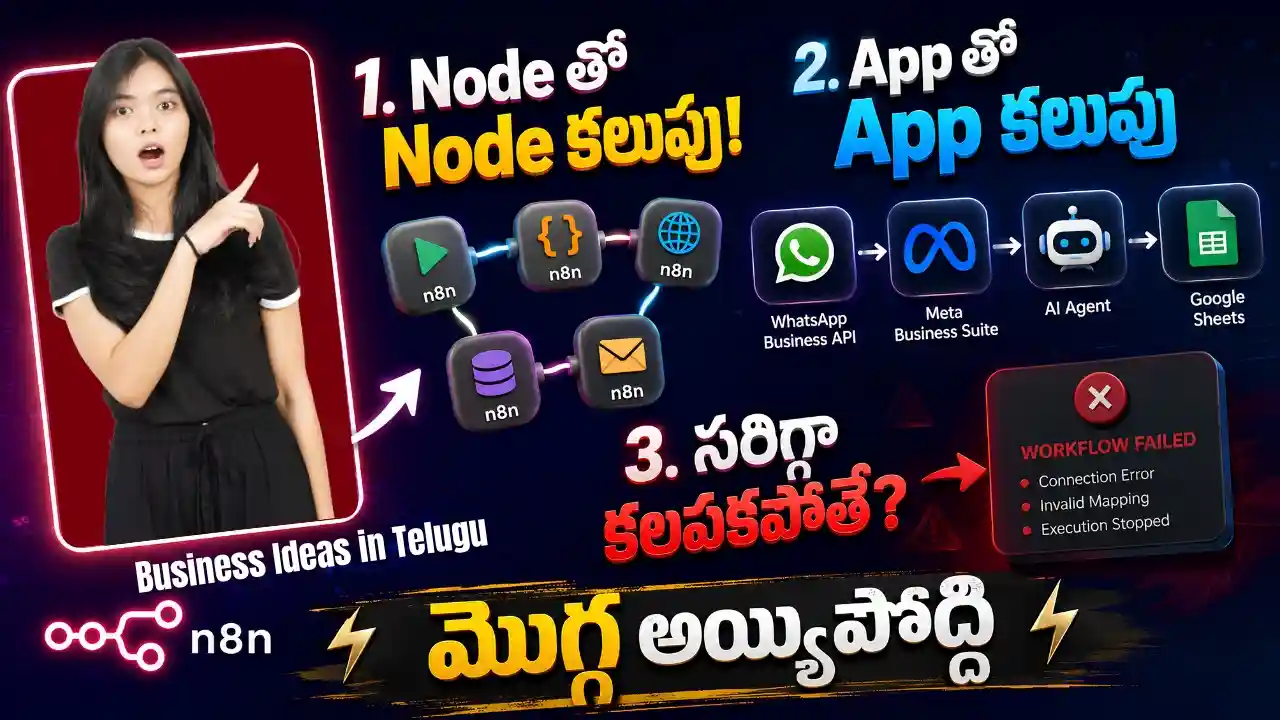
Complete Node Connection Map
సో మూడు nodes complete అయ్యాయి. ఇప్పుడు connection ఎలా ఉందో చూద్దాం.
Node 1 : WhatsApp Business Cloud (Trigger - On Message)
  Credential : Client ID = App ID | Client Secret = App Secret
  Output     : Message body, sender number (from field)
       |
       | message body ని User Message కి map చేస్తాం
       ↓
Node 2 : AI Agent
  Chat Model : OpenAI GPT-4o mini
  User Message : Trigger నుంచి body field
  System Prompt : మీ business instructions
  Output : AI generated reply text
       |
       | AI output text ని Message Body కి map చేస్తాం
       ↓
Node 3 : WhatsApp Business Cloud (Action - Send Message)
  Credential : Access Token + Business Account ID
  Phone Number ID : Test number (dropdown)
  Recipient : Trigger నుంచి "from" field
  Message Body : AI Agent output text
       |
       ↓
Customer కి WhatsApp Reply వెళ్తుంది
ఇది complete workflow. Save చేయండి.
Step 6 : Workflow Test చేయడం
సో workflow build అయింది, ఇప్పుడు test చేయాలి. Test చేయకుండా activate చేయకండి, ముందు test చేసి అన్నీ correct గా పని చేస్తున్నాయా confirm చేసుకోండి. n8n లో right top corner లో Execute Workflow button ఉంటుంది. దాన్ని click చేయండి. Workflow waiting state లో ఉంటుంది, ఒక message వచ్చే వరకు wait చేస్తుంది.
సో ఇప్పుడు మీ personal WhatsApp నుంచి Meta Business Suite లో కనిపించే test phone number కి ఒక message పంపండి. “Hello” అని పంపండి. Message పంపిన కొన్ని seconds లోపు n8n లో ఏం జరుగుతుందో చూద్దాం.
Testing Process – Node by Node
- WhatsApp Trigger node మీద green icon వస్తుంది. అంటే message successfully received అయింది. Node click చేసి output లో మీరు పంపిన message text కనిపిస్తుందా check చేయండి.
- AI Agent node మీద green icon వస్తుంది. Output లో AI generate చేసిన reply text కనిపిస్తుంది. ఉదాహరణకు “Hello! How can I assist you today?” లాంటి reply వస్తుంది.
- Send Message node మీద green icon వస్తుంది. అంటే reply successfully sent అయింది. మీ phone లో WhatsApp check చేయండి, AI reply వచ్చింది చూసారా?
ఒక node మీద red icon వస్తే ఏదో error ఉంది అని అర్థం. ఆ node click చేసి error message చదవండి. Most common errors ఏమిటంటే credentials wrong గా paste చేశారంటే connection error వస్తుంది, expression wrong గా map చేశారంటే data error వస్తుంది. Error బట్టి fix చేసి మళ్ళీ Execute Workflow click చేయండి.
Test Scenarios Try చేయండి
- “Hello” పంపి basic reply check చేయండి
- “What are your services?” పంపి relevant reply వస్తుందా check చేయండి
- “మీ office timing ఏమిటి?” పంపి Telugu reply వస్తుందా check చేయండి
- Random question పంపి AI ఎలా handle చేస్తుందో check చేయండి
అన్నీ expected గా వస్తున్నాయి అని confirm అయిన తర్వాత workflow activate చేయవచ్చు.
Step 7 : Workflow Activate చేయడం
సో testing successful అయిన తర్వాత workflow activate చేద్దాం. Activate చేస్తే ప్రతిసారి manually Execute Workflow click చేయాల్సిన అవసరం ఉండదు. WhatsApp కి ఎవరైనా message చేసినప్పుడు automatically workflow run అవుతుంది. Workflow top right corner లో Inactive అని ఉన్న toggle చూసారా? దాన్ని click చేసి Active చేయండి. అయిపోయింది.
ఇప్పుడు మీరు computer దగ్గర లేకపోయినా, రాత్రి అయినా, ఏ time అయినా WhatsApp కి message వచ్చినప్పుడు AI automatically reply ఇచ్చేస్తుంది. మీ business 24/7 available గా ఉంటుంది customers కి.
Production కి వెళ్ళే ముందు ఒక important step చేయాలి. Permanent Access Token setup చేయాలి. ఇప్పుడు use చేసిన token temporary, 24 గంటల తర్వాత expire అవుతుంది. Expire అయిన తర్వాత WhatsApp replies ఆగిపోతాయి. Permanent token కోసం Meta Business Suite లో Settings కి వెళ్ళి Users section లో System Users option select చేయండి. అక్కడ ఒక system user create చేసి WhatsApp account కి access ఇవ్వాలి, తర్వాత ఆ system user కి token generate చేయాలి. ఆ token expire కాదు.
Cost Management మరియు Spam Control గురించి తప్పకుండా చదవండి
సో ఇది చాలా important topic మరియు చాలా మంది ఈ విషయం ignore చేస్తారు, తర్వాత bills చూసి shock అవుతారు. Workflow activate అయిన తర్వాత WhatsApp కి ఎవరు message చేసినా ప్రతి message కి AI trigger అవుతుంది. ప్రతి trigger కి WhatsApp API cost అవుతుంది, OpenAI API cost అవుతుంది, n8n execution count పెరుగుతుంది. ఒకవేళ spam numbers నుంచి 1000 messages వస్తే, ప్రతి message కి cost అవుతుంది అంటే monthly bill చాలా పెరిగిపోయే అవకాశం ఉంది.
అందుకే ఈ precautions తీసుకోండి.
- Workflow లో Trigger node తర్వాత Condition node add చేయవచ్చు. Specific conditions meet అయిన messages మాత్రమే AI కి వెళ్ళాలి అని set చేయవచ్చు.
- Per number rate limiting పెట్టవచ్చు. ఒక number నుంచి గంటకు maximum కొన్ని messages మాత్రమే process అవ్వాలి అని limit పెట్టవచ్చు.
- GPT-4o mini use చేయండి, GPT-4o expensive గా ఉంటుంది. Basic customer support కి mini version sufficient గా ఉంటుంది.
- OpenAI dashboard లో మరియు Meta Business dashboard లో monthly usage monitor చేయండి. Budget alerts set చేయండి.
కాస్ట్ గురించి భయపడకండి, scale అయ్యేకొద్దీ ఖర్చు పెరిగితే Mudra Yojana లో collateral లేకుండా లోన్ దొరుకుతుంది. పూర్తి వివరాలు మా AI Startup Loan బ్లాగ్లో ఉన్నాయి.
Advanced Options : Memory, Tools మరియు System Prompt
Basic setup complete అయిన తర్వాత AI agent ని మరింత powerful గా చేసుకోవచ్చు. ఇవి optional కానీ business కి చాలా useful గా ఉంటాయి.
Window Buffer Memory add చేస్తే AI ఒక conversation లో అన్ని messages remember చేస్తుంది, customer రెండో message పంపినప్పుడు context తెలుసు, natural conversation experience వస్తుంది. AI Agent node లో Memory section లో plus click చేసి Window Buffer Memory select చేయాలి.
Tools section లో external services connect చేయవచ్చు. Google Calendar connect చేస్తే AI directly appointment book చేయగలదు. Google Sheets connect చేస్తే customer queries automatically log అవుతాయి, తర్వాత review చేయవచ్చు. CRM connect చేస్తే new customer automatically CRM లో add అవుతుంది, follow-up manually చేయాల్సిన అవసరం తగ్గుతుంది. ఇవి n8n లో AI Agent node Tools section లో add చేయవచ్చు.
System Prompt చాలా carefully రాయాలి. మీ business గురించి brief గా చెప్పాలి, AI ఏ language లో reply చేయాలో చెప్పాలి, ఏ tone use చేయాలో చెప్పాలి, ఏ information ఇవ్వకూడదో చెప్పాలి, AI కి తెలియని question వస్తే ఏం చేయాలో చెప్పాలి. System Prompt బాగా రాసినప్పుడు AI దాదాపు real customer support agent లా behave చేస్తుంది.
తరచుగా అడిగే ప్రశ్నలు
n8n WhatsApp AI Agent free గా use చేయవచ్చా?
n8n cloud free plan లో limited executions ఉంటాయి, 14 Days Free. low volume testing కి సరిపోతుంది. WhatsApp Business Cloud API కి Meta charge చేస్తుంది కానీ small volume కి cost చాలా తక్కువగా ఉంటుంది. OpenAI API కి usage బట్టి charge అవుతుంది. GPT-4o mini use చేస్తే cost చాలా తక్కువగా ఉంటుంది. Business scale పెరిగిన కొద్దీ cost పెరుగుతుంది కాబట్టి scale బట్టి plan upgrade చేసుకోవాలి. క్లయింట్లు ఎక్కడ దొరుకుతారు అని ఆలోచిస్తే, మ్యానువల్గా DM లు పంపకండి, టైం వేస్ట్. మా LinkedIn Job Automation లో చెప్పిన లాజిక్ client outreach కి కూడా పనికొస్తది.
Access Token 24 గంటల తర్వాత expire అయిన తర్వాత ఏం చేయాలి?
Temporary token expire అయిన తర్వాత Send Message node work చేయదు, WhatsApp replies ఆగిపోతాయి. API Setup page కి వెళ్ళి Generate Access Token మళ్ళీ click చేసి new token generate చేయవచ్చు కానీ ఇది permanent solution కాదు. Production కి permanent System User Token setup చేయడం must.
Real customers కి messages పంపడానికి verified business కావాలా?
Testing కోసం Meta verification అవసరం లేదు. కానీ real customers కి large scale లో messages పంపాలంటే Meta business verification complete చేయాలి. ఇందుకు business registration documents అవసరమవుతాయి మరియు verification process కొంత time తీసుకుంటుంది.
Workflow లో ఒక specific number నుంచి వచ్చే messages మాత్రమే process చేయవచ్చా?
అవును. Trigger node తర్వాత Condition node add చేసి, “from” field specific number తో match అవుతుందా check చేయవచ్చు. Match అయినప్పుడు మాత్రమే AI Agent కి pass అవుతుంది, అయినప్పుడు stop అవుతుంది.
n8n self-hosted vs cloud ఏది better?
Beginners కి cloud version recommend చేస్తాను, setup easy గా ఉంటుంది మరియు maintenance చేయాల్సిన అవసరం ఉండదు. Advanced users కి data privacy important అయినప్పుడు లేదా cost save చేయాలనుకున్నప్పుడు self-hosted option consider చేయవచ్చు కానీ server manage చేయాల్సిన responsibility ఉంటుంది.
WhatsApp లో image వచ్చినప్పుడు AI process చేయగలదా?
అవును, possible కానీ advanced setup కావాలి. GPT-4o vision capable model use చేయాలి. WhatsApp trigger నుంచి image download చేసి AI కి pass చేయాలి. ఇది basic setup complete అయిన తర్వాత explore చేయవచ్చు.
Few words before you go!
WhatsApp ఒక్కటే కాదు, Instagram, website chat కూడా ఒకే AI handle చేయగలదు. పూర్తి సెటప్ మా Multi LLM Chatbots బ్లాగ్లో ఉంది, Meta Business Suite లో అన్ని channels ఒకే దగ్గర manage చేసుకోండి. సో ఈ article లో n8n WhatsApp AI Agent complete setup చూసాం. Meta Business Suite లో Business Portfolio create చేయడం నుంచి Facebook App create చేయడం, App ID మరియు App Secret copy చేయడం, WhatsApp API Setup లో Access Token generate చేయడం, n8n లో WhatsApp Trigger node setup చేయడం, AI Agent node లో Chat Model మరియు User Message configure చేయడం, Send Message node లో credentials మరియు data mapping చేయడం, testing చేయడం, activate చేయడం అన్నీ step by step గా చూసాం.
ఒక్కసారి carefully follow చేస్తే మీ WhatsApp fully automated గా పని చేస్తుంది. మీరు లేకపోయినా, రాత్రి అయినా, WhatsApp reply ఆగదు. Customer కి instant response వస్తుంది, customer satisfaction పెరుగుతుంది, మీ time కూడా చాలా save అవుతుంది. Cost management మరియు permanent token setup తప్పకుండా చేయండి, production లో smooth గా run అవుతుంది.
మీకు ఏమైనా doubts ఉంటే లేదా ఏ step లో అయినా problem వస్తే comment section లో చెప్పండి. Complete in-depth training కావాలంటే n8n automation course లో join చేయవచ్చు. Direct help కావాలంటే WhatsApp లో connect చేయవచ్చు.